blog
Configuring OpenWRT router to enable access to IP Camera
This tutorial describes how to configure your OpenWRT router to make an IP camera accessible externally from WAN. The camera used is a HIKVision DS-2CD1321-I Dome camera connected to the router through a PoE adapter.
Connect the camera to the router
Use your camera’s manual to setup the connection from the router to the camera. Connect your home laptop or PC to the router so that the camera and the laptop are on the same local network.
Once they are connected, you should be able to access the camera using it’s
local IP address, for e.g. 192.168.1.64, through the browser.
Modify firewall policy in the OpenWRT Router
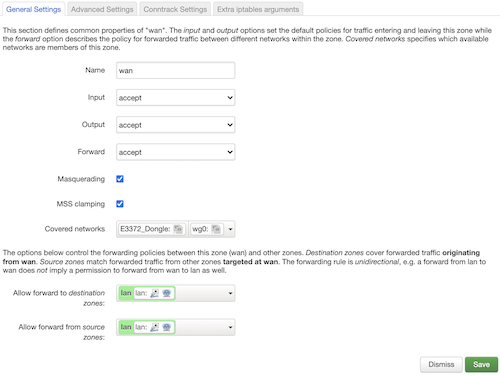
Open the LuCI web interface of your OpenWRT router and go to Network > Firewall > Zones.
Add all the required interfaces to the WAN zone by going to wan > Edit > Covered Networks.
Set the Allow forward to destination zones to lan.
Add port forwarding rules
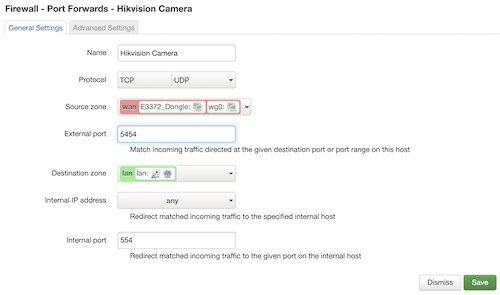
On the LuCI web Interface of your OpenWRT router, navigate to Network > Firewall > Port forwards
and click the add button.
Set a name for the forwarding rule and add wan as the Source zone. Set an External port of your choice and
set the internal port to the port through which the camera provides the feed. If the camera provides the feed
through the RTSP Protocol, the port will
most likely be 554. Set the Internal IP Adress to the IP address of the camera in the local network.
Click save and then save and apply.
Wrapping up
You should be able to access your camera feed now by using a network video player like VLC.
If you have connected your router to a hosted server using a tunnel, you can access
the camera feed by using the IP address of the hosted server and the External Port
in the port forwarding rule set above.
Enjoy!